With ESXi 9.1, VMware significantly redesigned the Memory Tiering implementation introduced in earlier vSphere releases. What initially started as a rather experimental feature based on kernel boot options and reboot-driven workflows has now evolved into a fully integrated platform capability with its own dedicated management stack.
The new implementation simplifies deployment, removes reboot requirements, introduces runtime configuration changes and provides deeper integration into the ESXi memory management architecture.
This article walks through:
- what changed in ESXi 9.1
- how the new Memory Tiering workflow works
- how to configure NVMe-based memory tiers
- how to monitor the feature
- and what to consider before enabling aggressive tiering ratios
What is Memory Tiering?
Memory Tiering extends traditional DRAM by adding a secondary NVMe-based memory layer.
In simple terms:
- frequently accessed memory pages remain in DRAM
- less frequently used („cold“) pages are migrated to NVMe
This approach is significantly more efficient than traditional swapping because ESXi actively analyzes memory access patterns and migrates cold pages proactively.
The result:
- higher VM density
- reduced swap activity
- improved overcommit behavior
- better handling of large memory footprints
Especially for:
- large VDI environments
- Kubernetes platforms
- VMware Cloud Foundation
- AI and analytics workloads
- nested virtualization labs
- high-density consolidation clusters
Memory Tiering can dramatically increase usable host memory capacity.
What Changed in ESXi 9.1?
One of the biggest changes in ESXi 9.1 is the complete replacement of the original configuration model.
Earlier implementations relied heavily on:
- VMkernel boot options
- advanced settings
- manual tier device creation
- host reboots
For example:
esxcli system settings kernel set -s MemoryTiering -v TRUEand:
esxcli system settings advanced set -o /Mem/TierNvmePctThese methods are now deprecated.
In ESXi 9.1, the old MemoryTiering kernel option is marked as:
Obsolete option, do not use.Attempting to configure tiering through the old advanced setting interface may result in errors such as:
970:VSI_NODE_config_intOptsThe reason is simple:
ESXi 9.1 introduces a completely new management namespace:
esxcli memtierThe New ESXi 9.1 Memory Tiering CLI
The new implementation provides dedicated commands for:
- configuration
- device management
- runtime monitoring
- activation/deactivation
Available namespaces:
esxcli memtier config
esxcli memtier device
esxcli memtier status
Key advantages:
- no reboot required
- runtime enablement
- simplified operational workflow
- integration with DRS and VM-level controls
- support for mirrored NVMe tier devices
Preparing NVMe Devices
Before enabling Memory Tiering, the NVMe device must:
- not contain VMFS
- not be used as a datastore
- not host scratch partitions
- not be the ESXi boot device
Check the device:
esxcli storage core device listImportant properties:
Is SSD: true
Is Local: true
Is Boot Device: false
VMware also recommends using „Mixed Use“ class NVMe devices due to endurance and sustained write characteristics.
Configuring Memory Tiering
The configuration model is now straightforward.
Syntax:
esxcli memtier config setParameters:
| Parameter | Description |
|---|---|
-d | NVMe device |
-r | Tier size percentage relative to DRAM |
-c | Enable encryption |
Understanding Tier Ratios
The tier size percentage defines how much NVMe capacity may be used relative to installed DRAM.
Formula:
$$
\frac{NVMe\ Tier}{DRAM}\times100
$$
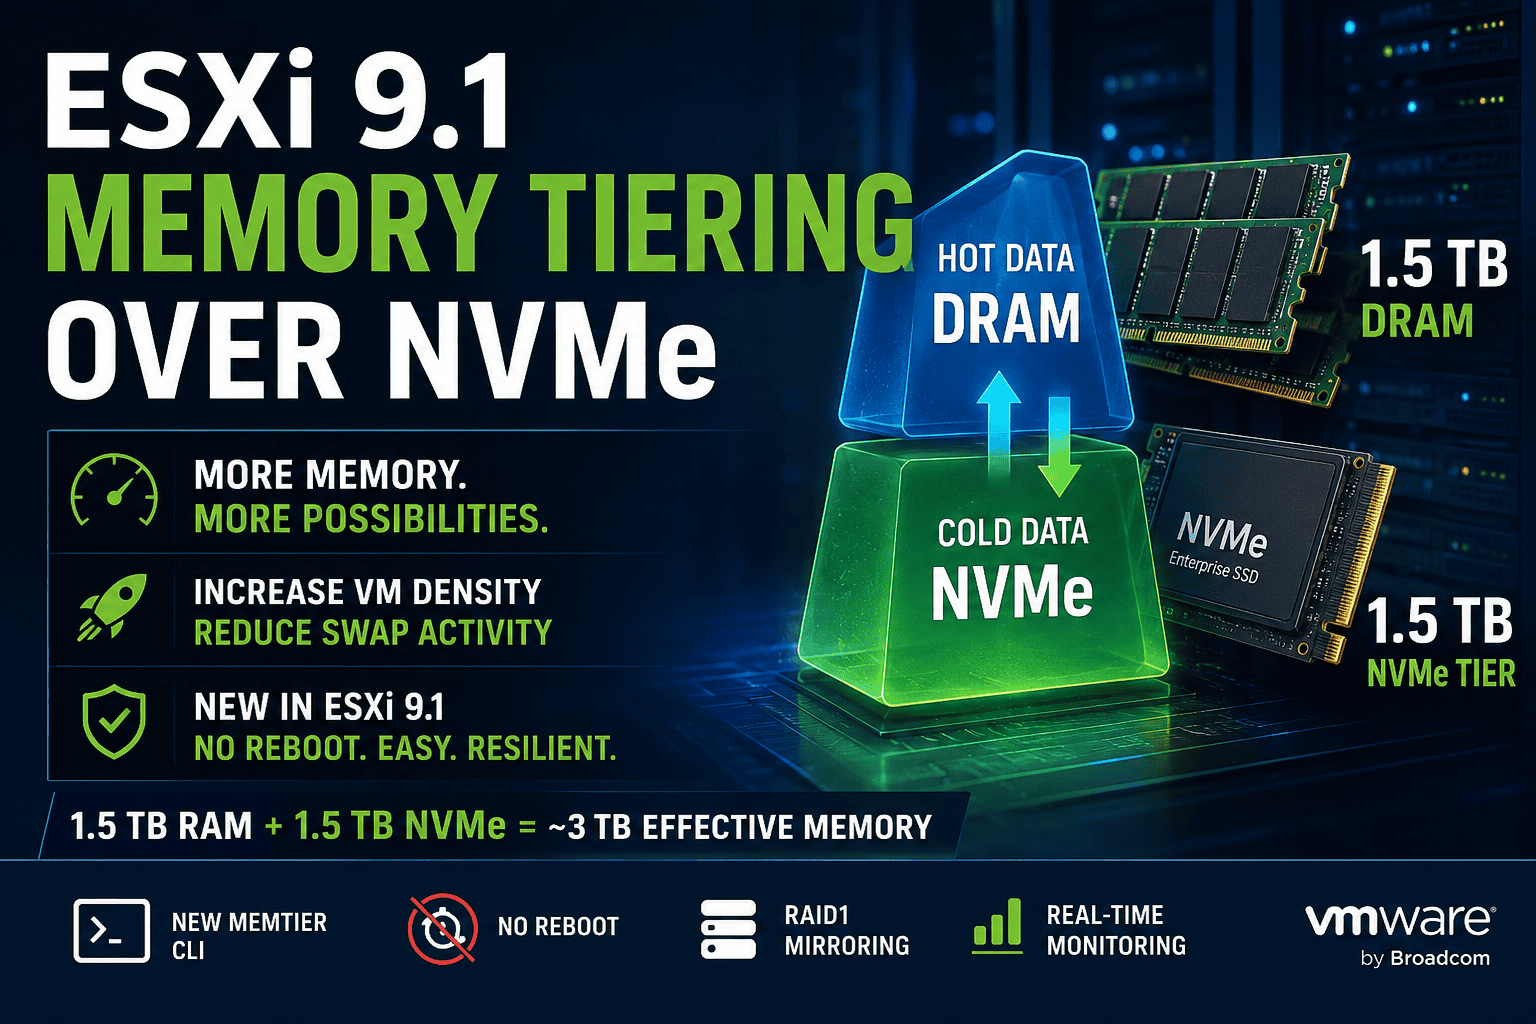
Example 1 – 1.5 TB DRAM + 1.5 TB NVMe Tier
A very typical modern dual-socket virtualization host might contain:
- 1.5 TB DRAM
- 2x 1.6 TB enterprise NVMe drives
To configure a balanced 1:1 ratio:
$$
\frac{1.5\ TB}{1.5\ TB}\times100=100
$$
Configuration:
esxcli memtier config set \
-d <device-id> \
-r 100
Result:
| Tier | Capacity |
|---|---|
| DRAM | 1.5 TB |
| NVMe Tier | 1.5 TB |
| Effective Capacity | ~3 TB |
This is currently VMware’s recommended configuration for predictable performance.
Example 2 – 2 TB DRAM + 4 TB NVMe Tier
High-density VDI or cloud clusters may choose a more aggressive ratio.
Example:
- 2 TB DRAM
- 4 TB NVMe
$$
\frac{4\ TB}{2\ TB}\times100=200
$$
Configuration:
esxcli memtier config set \
-d <device-id> \
-r 200
Result:
| Tier | Capacity |
|---|---|
| DRAM | 2 TB |
| NVMe Tier | 4 TB |
| Effective Capacity | ~6 TB |
This configuration increases VM density significantly but may introduce higher migration activity and NVMe write pressure.
Example 3 – AI / Analytics Host with 4 TB DRAM + 8 TB NVMe
Large AI and analytics systems frequently contain extremely large memory footprints.
Example:
- 4 TB DRAM
- 8 TB NVMe
$$
\frac{8\ TB}{4\ TB}\times100=200
$$
Configuration:
esxcli memtier config set \
-d <device-id> \
-r 200
Potential effective memory pool:
| Tier | Capacity |
|---|---|
| DRAM | 4 TB |
| NVMe Tier | 8 TB |
| Effective Capacity | ~12 TB |
This can dramatically reduce DRAM requirements for workloads with large cold-memory footprints.
Enabling Memory Tiering
Once configured:
esxcli memtier enableor:
esxcli memtier enable -d <device-id>No reboot is required in ESXi 9.1.
However, VMware still recommends placing the host into Maintenance Mode before changing Memory Tiering configurations.
Monitoring Memory Tiering
Configuration:
esxcli memtier config getRuntime status:
esxcli memtier status getDevices:
esxcli memtier device listDeep Visibility with VSISH
The internal memory tiers can be inspected through VSISH.
List tiers:
vsish -e ls /memory/tiersInspect DRAM tier:
vsish -e get /memory/tiers/0/infoInspect NVMe tier:
vsish -e get /memory/tiers/1/infoTier 0 represents DRAM.
Tier 1 represents NVMe-backed memory.
Dynamic Tier Initialization
One particularly interesting observation in ESXi 9.1 is that NVMe tiers may not become visible immediately after configuration.
In many cases:
- Tier 1 appears only under actual memory pressure
- migration structures initialize dynamically
- ESXi activates tier usage lazily
This behavior likely reduces:
- unnecessary SSD writes
- metadata overhead
- idle tier management activity
and reflects a much more mature implementation compared to earlier preview versions.
Resiliency Improvements in ESXi 9.1
One of the most important additions in ESXi 9.1 is support for mirrored Memory Tiering devices.
With RAID1-style mirroring:
- a failed NVMe device no longer causes Memory Tiering failure
- tier operations continue on the secondary device
- resiliency improves significantly
This enhancement makes Memory Tiering far more viable for production environments.
Important Considerations
Although NVMe is fast, it is still significantly slower than DRAM.
Very aggressive ratios can lead to:
- thermal throttling
- increased SSD wear
- migration overhead
- page churn
- unpredictable latency spikes
VMware now officially recommends keeping:
$$
DRAM\geq NVMe\ Tier
$$
whenever possible for the best consistency and performance.
Final Thoughts
Memory Tiering in ESXi 9.1 represents a major architectural improvement over previous implementations.
The new memtier namespace:
- replaces legacy kernel tuning
- enables runtime configuration changes
- simplifies deployment
- improves operational visibility
- adds resiliency features
- and integrates Memory Tiering more deeply into the ESXi platform
For high-density virtualization clusters, AI infrastructure, VDI environments and cloud platforms, Memory Tiering can significantly increase effective memory capacity while maintaining far better behavior than traditional swapping approaches.


Schreibe einen Kommentar